

Experiences
Growing peanuts in our organic garden
The peanut (Arachis hypogaea) is a fascinating groundnut native to South America. That means it naturally demands warm conditions and doesn't always growth easily in cool northern climates. Nevertheless, experimenting with peanuts is fascinating. Not only does it yield an attractive, lush green plant, but with the right care, you can also reap a rewarding harvest of fresh, delicious homegrown peanuts. Initially, finding unroasted viable seeds is challenging. Specialty heritage seed merchants online often charge steep prices for a handful of kernels. Then we found out that unroasted bird feed peanuts in their shells often germinate very well. A few germination tests proved they sprouted reliably. When choosing peanuts to grow, ensure the shells is fully intact. Damaged shells usually mean dried-out kernels with poor germination rates.
Pre-sprouting seeds in small seed trays or biodegradable pots using high-grade organic seed compost delivers the best results. Moisture management is critical here. Soil must remain lightly damp, never soaked, as waterlogged conditions quickly cause seeds to rot. Sow one seed horizontally per pot, seal inside a clear plastic bag to lock in humidity, and keep around 25°C. A seedling heating mat provides an ideal constant temperature. Sprouts generally poke through after about ten to fourteen days, at which point the cover is removed and gentle bottom-watering keeps them growing happily.

Growth rates depend closely on warmth and sunshine. Under optimal greenhouse or windowsill conditions, peanut plants develop rapidly. Moving them straight out into open garden soil often fails unless you enjoy an unusually hot, sunny season in a well-sheltered corner. Growing them in large containers placed on a sunny patio or inside an unheated polytunnel or glasshouse proves vastly more reliable. Plants must never be brought outside before mid-May once all risk of frost has passed. Soil requirements are surprisingly modest. As legumes, peanut plants fix atmospheric nitrogen naturally via root nodules, meaning high-nitrogen fertilizers must be strictly avoided to prevent lush foliage at the expense of blossoms.

Peanuts develop subterranean pods through a unique botanical process called geocarpy. Once the self-pollinating yellow flowers fade, an elongated stalk known as a 'peg' extends downward and burrows several inches into the earth. Once safely underground, the tip expands into the familiar seed pod. Because indoor spaces often lack natural pollinators or air movement, gentle tapping or using a soft brush helps ensure pollination. The necessity of pegging explains why broad, shallow pots or wide containers work far better than deep, narrow planters. Come autumn, as the foliage yellows, lift the entire plant carefully. A robust specimen can yield 30 to 40 pods. Wash off soil gently and hang the entire plant in a warm, dry, well-ventilated shed to cure. Once crisp and dried, roast them gently in the oven or air fryer, and always remember to reserve a handful of unroasted seeds for next spring's adventures.
Composting
A thriving compost heap functions as a dynamic living ecosystem. When managed with care, biological composting turns garden offcuts into pure black gold that rejuvenates living soil. Poorly maintained heaps, conversely, can spread weeds or plant-pathogens. Building balanced compost requires understanding a few core biological principles.
While almost all plant matter can theoretically break down, diseased materials require caution. We deliberately keep tomato vines, potato and eggplants with signs of blight out of standard heaps, as stubborn spores like phytophthora can survive suboptimal heat cycles and reinfect future crops. Citrus peels decompose poorly and risk shifting microbial balance if added in heavy concentrations.
Surface area matters tremendously. Chopping fibrous stems into 3 to 5 cm sections drastically accelerates bacterial and fungal colonization. Woody branches belong at the base for airflow or through a woodchipper first. With optimal layering, active core temperatures comfortably reach 55 to 60°C, naturally sanitizing the mixture by neutralizing nuisance weed seeds and harmful organisms through beneficial biological heat.
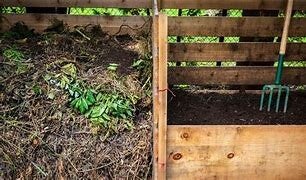
The layered method for healthy organic compost:
Building layers methodically from ground level upwards:
Base layer
Coarse branch trimmings, woody stems, or dry straw to promote natural chimney-effect aeration.
Second layer
A diverse blend of green garden prunings, vegetable offcuts, and wilted comfrey foliage.
Third layer
A dusting of finished compost or healthy garden loam to inoculate with beneficial microbes.
Fourth layer
Further carbon-rich brown matter such as shredded leaves or straw.
Fifth layer
A thin dusting of soil or mature worm castings.
Sixth layer
Nitrogen accelerator such as aged farmyard manure or organic plant pellets.
Seventh layer
Further diverse plant matter from the kitchen and allotment borders.
Eighth layer
Natural agricultural lime or calcified seaweed to stabilize acidity.
Subsequent layers repeat this green and brown balance until the bay is full, turning every 4 to 6 weeks for oxygenation.
Running three distinct bays in progressive stages allows an effortless annual cycle: one collecting, one actively maturing, and one ready for the garden beds. Remember: compost functions primarily as an organic soil conditioner rather than a concentrated fertilizer, reviving microbial soil food webs.
Winter cauliflower
Cauliflower is deeply satisfying to produce, yet summer-grown varieties often prove notoriously temperamental, bolting in heatwaves or falling prey to cabbage white butterflies. Overwintering cauliflower offers a far more ewarding alternative that produces pristine, dense white heads early the following spring.
Sown in June or early July into nursery seedbeds or module trays, overwinter varieties germinate quickly without high artificial heat. Pricking them out into individual pots gives seedlings strong root systems before they are bedded out permanently in late August. Space them generously—at least 70 cm apart—because they develop substantial foliage before growth halts in winter chills. Providing organic bone meal and blood meal replenishes essential phosphorus and calcium early on.
Winter pest pressures remain delightfully low. Slugs seek shelter under outer leaves but are easily hand-collected, while caterpillars are absent during freezing months. Protecting plants with sturdy anti-bird netting remains essential to deter hungry wood pigeons during midwinter food shortages. Come early spring, growth rebounds vigorously. By mid-to-late April, crisp, tightly packed cauliflowers are ready for harvesting weeks ahead of any spring-planted crops.

Bush and climbing beans
Few homegrown vegetables rival the tenderness of freshly picked garden beans. Whether choosing slender snap beans or meaty heritage varieties, cultivating beans teaches vital lessons about soil temperature and timing. Beans detest cold, saturated spring soil, which swiftly causes seeds to rot before sprouting. An old allotment adage reminds growers never to rush beans into open earth until late May when the soil has genuinely warmed.
Starting seeds indoors in module trays provides a dependable head start. Cell trays filled with light organic potting mix allow sets of 3 to 4 seeds to emerge safely away from mice and cold damp. Placing trays in a warm, bright greenhouse produces sturdy, well-rooted clumps within a couple of weeks, ready for hardening off and planting out once night frosts disappear.

Clump planting works remarkably well as a succession crop immediately following first-early potatoes. Once the potato crop is harvested, raking over the loose bed allows bean rootballs to drop straight into the soil without delays.
Managing soil nutrients is straightforward. As legumes, beans supply their own nitrogen through symbioses with rhizobia bacteria. Planting in ground over-amended with fresh manure results in massive leafy growth with very few flowering pods. Following potatoes, which consume residual fertility, strikes an ideal balance.
Pick pods regularly every few days using both hands—one to anchor the vine and the other to snap the stem cleanly. Consistent harvesting encourages continuous flowering straight through late summer. When beds are cleared, chop the foliage at ground level and leave roots in the earth to decompose, preserving organic nitrogen for subsequent leafy brassicas.
Tomatoes

Raising organic tomatoes outdoors provides unmatched flavor, but unpredictable cool and humid summer weather brings real risks of late blight (Phytophthora infestans). Wind-borne spores thrive when leaves remain wet for extended intervals, turning vigorous green bushes brown and decayed in mere days. Early defensive care, good shelter, and excellent air movement form the foundation of our growing strategy at Claybird.

Choosing robust cherry types or certified blight-tolerant cultivars significantly improves seasonal success outdoors. In addition to careful variety selection, our garden routine follows these core guidelines:
- Observe strict 4-year crop rotations away from solanaceous plants like potatoes.
- Position plants in maximum all-day sun with good shelter from driving winds.
- Maintain generous spacing of at least 65 to 70 cm between indeterminate stems.
- Keep beds clean of competing weeds and mulch with clean straw.
- Prune lower foliage up to the first flower cluster to prevent rain splashback from damp soil.
- Remove any suspicious yellowing or spotted leaves immediately with clean shears.
Side-shooting, or removing side shoots from leaf axils on cordon plants, directs vital solar energy into flower truss development rather than sprawling leafy excess.

Regular side-shooting during dry sunny afternoons allows wounds to callus quickly. When four or five robust fruit trusses have set on outdoor plants, topping the main growing tip focuses all lingering warmth into ripening existing fruits before autumnal chills settle in. Feeding with weekly diluted worm castings tea supports sweet, aromatic crops.
Grafting tomatoes for vitality
To overcome cool soils and vigor limitations, grafting heirloom scions onto specialized vigorous rootstocks has transformed our harvests. Rootstock hybrids offer colossal root systems and comprehensive soil-borne disease resistance, pumping steady moisture and nutrients even in unpredictable weather. Equipment required is straightforward: quality tomato rootstock seeds, desired heirloom seeds, 1.5 mm silicone grafting clips, a fresh surgical razor blade, and a small humidity dome.

Method and aftercare:
Both scion and rootstock varieties are sown simultaneously indoors under grow lights in early spring. Once seedling stems reach an identical 1.5 to 2 mm thickness, grafting commences in a shaded room away from harsh drying sunshine.
Using a sterile razor, both rootstock and scion are severed at matching 45-degree angles. A flexible silicone clip secures the two vascular cambium layers into tight, exact contact. Seedlings are instantly transferred into an airtight propagation box with 100% relative humidity, kept warm at 20 to 22°C out of direct light for five days while graft unions heal.
Gradual daily ventilation hardens plants off before potting on. Our success rate routinely exceeds 80%, yielding exceptionally vigorous plants that carry abundant fruit throughout the season.

Heritage Walcherse kogelboon
Preserving rare regional crops is among our favorite gardening passions. The Walcherse kogelboon is an ancient Zeeland round dry bean, renowned historically for its dense, buttery texture and sweet nutty profile. Once widely exported throughout the 19th century, commercialization nearly drove it to extinction as industrial farms favored bulkier varieties.
Unlike common runner beans, this heritage bush variety retains its structure perfectly when simmered in stews without breaking apart into mush. Tracking down true seed took patience, but rediscovering this coastal heirloom has proven a cornerstone of our seasonal trials.
With its distinct spherical, egg-shaped seeds and resilient dwarf growth habit, it stands proud as a true culinary and horticultural treasure.

Naturally adapted to coastal clay soils, the Walcherse kogelboon thrives in compact conditions without needing elaborate bamboo cane frameworks. Sown directly in late May or early June in circular clusters of 5 to 7 seeds, the plants lean together to create self-supporting, sturdy clumps roughly 50 cm high. They tuck neatly between slower sweetcorn rows and dry reliably on the plant by late September for winter pantry storage, keeping authentic regional flavors alive in the garden.
